 Vanda Engine
In this tutorial, I open a sci-fi 3D door model in 3ds Max, split its meshes into 2 meshes, animate its door mesh, bake the keyframes, and export the result to COLLADA format with OpenCollada to be used in Vanda Engine or other game engines.
Opening the model
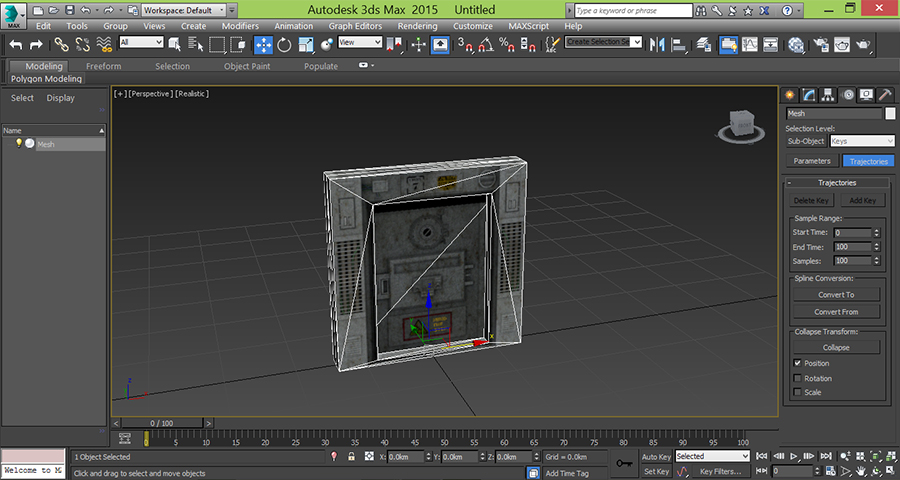
In this tutorial, I’m not going to talk about modelling the door mesh. I open the door sci fi door model already made in 3ds Max. Looking on the right side of 3ds Max confirms that this model contains 1 mesh.
If you convert this model to an editable poly and animate some faces of the model (in our case, door faces) and try to export the mesh to COLLADA format with OpenCollada, you’ll notice that other 3D tools or game engines won’t read the animation of your mesh, meaning that OpenCollada doesn’t export the animation of that mesh. It’s because COLLADA exports the animation of whole mesh– not the animation of its subsets including separate faces, vertices, and so one. So in order to solve this problem, we should split our 3D door model to 2 meshes: door frame mesh and door mesh. Now that our mesh contains 2 separate meshes, we can animate the door mesh individually and export our 3D model to COLLADA format.
Splitting one mesh to multiple meshes in 3ds Max
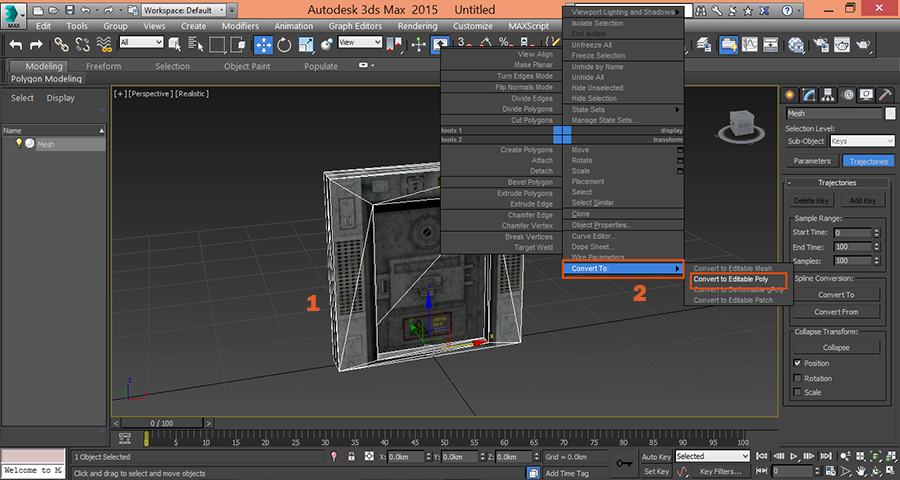
First of all, we should convert our mesh to an editable poly mesh. Select your mesh, then right click somewhere on the viewport and from the menu that appears, choose Convert To: | Convert to editable poly.
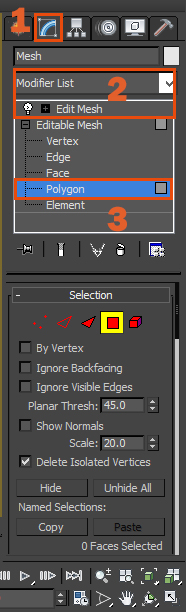
Now we can select individual faces of our mesh. On the left side of 3ds Max, select Modify table, then choose Edit Mesh from Modifier list, expand Editable Mesh, and select Polygon.
Now select the faces that you want to convert to another mesh. Make sure to hold Ctrl button while adding other faces of your mesh. Also don’t forget to choose the faces of other side of the mesh.

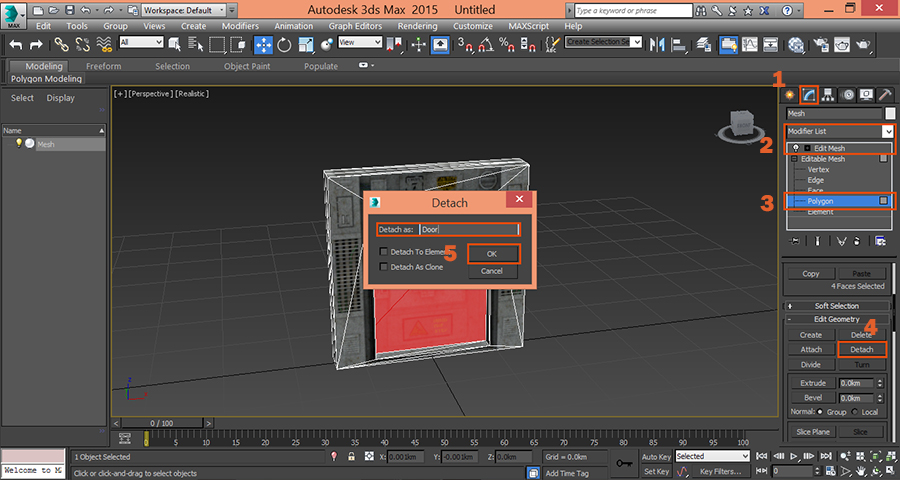
Now that we have selected the faces of our door, we should tell 3ds Max to use a separate mesh for these faces. Make sure that your faces are still selected and Modify tab is still active, then choose Detach button. A new dialog appears, asking you to enter a new name for your new mesh. Choose your desired name (in our case Door name is suitable), leave other options unchecked, and press OK to generate a new mesh. The new name appears on right side of 3ds Max.
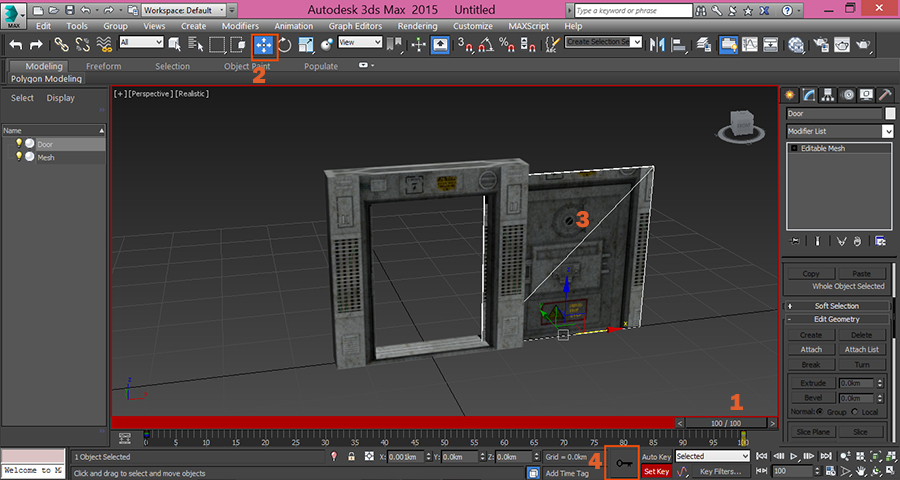
If you select the model, you’ll notice that your that your model is separated to two individual parts. Now we can animate the door mesh.
Animating the door mesh
Make sure that door model is selected and timeline is at frame 0. Select the door mesh, hit Set Key button, and hit Key button to generate the first key for your animation.
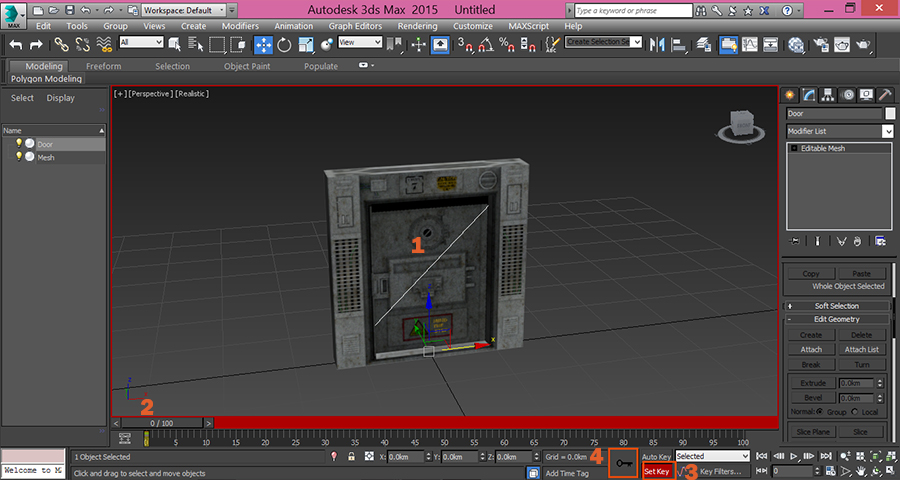
Now move the timeline marker to frame 100, choose move tool, and translate the door to simulate the open state. Once everything is set up, hit Set Key button to generate the keyframe at frame 100. Press Play button to test your animation and make sure that everything works as expected.
Baking keys in 3ds Max
In order to export the animation to COLLADA format, you should bake the keys. Make sure that Auto Key button is selected, then activate Motion tab on the right side of 3ds Max and select Trajectories.
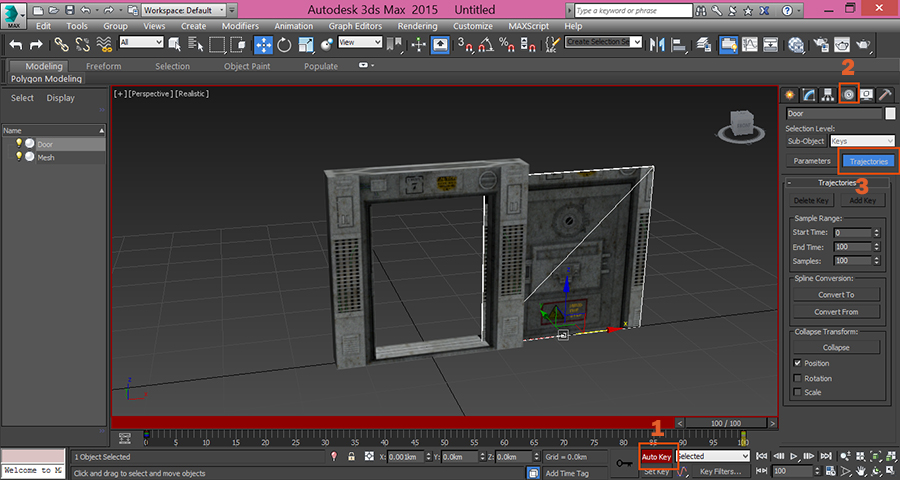
Roll out Trajectories and set the values of Sample Range. Sample range is your timeline or animation length:
- Start Time: 0. It’s the beginning of your animation.
- End Time: 100. It’s the end of your animation
- Samples: 100. This value specifies how many keys will be set. We want to have all frames keyed.
Collapse Transform specifies what do you want keyed: Position, Rotation, or Scale. I have only changed position of door mesh, so I check Position. Now click Collapse button to bake the animation keys.

Exporting to COLLADA format with OpenCollada
We use OpenCOLLADA to export our model to COLLADA format. For more information about OpenCOLLADA exporter for 3ds Max, please refer to the following tutorial:
Exporting from 3ds Max to COLLADA Format with OpenCOLLADA
Because we are going to export the model to Vanda Engine, it’s recommended to exported the animated part individually. However, if your favorite game engine supports both animated and static mesh in one exported file, you can export all meshes together in one dae file.
Select your door mesh (animated) and from the main menu of 3ds Max, choose File | Export | Export Selected. Choose your file a name, and press Save button. This will open the OpenCOLLADA export dialog. Make sure to set the following parameters:
- Normals: Checked
- Enable Export: Checked
- Sample Animation: Checked
- Start: 0
- End: 100
Press OK button to export the file.
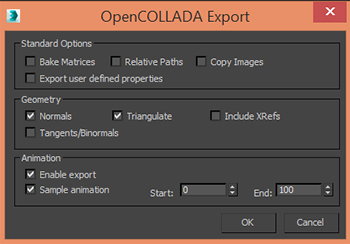
Now select door frame, choose File | Export | Export Selected, and make sure to set the following parameters in OpenCollada dialog:
- Normals: Checked
- Enable Export: Unchecked
Conclusion
COLLADA is a powerful exchange format that exchanges lots of data from your favorite 3D tool to your desired game engine. However, exporting animations from 3ds Max to COLLADA is a bit tricky. In this tutorial, we explained how to split the mesh and bake the keys to properly export the animation to COLLADA format.
(c) copyright Zehne Ziba Co., Ltd. For more information, please refer to copyright notice.