 Vanda Engine
Prefabs are the building block of Vanda Engine. The idea is simple: You create a specific prefab in Prefab mode and use it over and over in VScene mode to build your level. Each prefab in Vanda Engine is a container which holds up to three level of details (LOD). Each LOD is a separate scene containing many different elements including geometries, skeletons, cameras, lights, physics actors, and so on. Most of these elements are imported from a 3D tool capable of exporting to COLLADA (dae) format. You need to tell Vanda Engine which dae file refers to which LOD. It’s done via _LOD[i] postfix. For example if you want to associate a dae file called box.dae with LOD 1 of your prefab, you need to use this name for your dae file: box_LOD1.dae. When you switch to prefab mode and import this dae file, Vanda Engine automatically assigns the elements of this dae file to LOD 1 of your prefab.
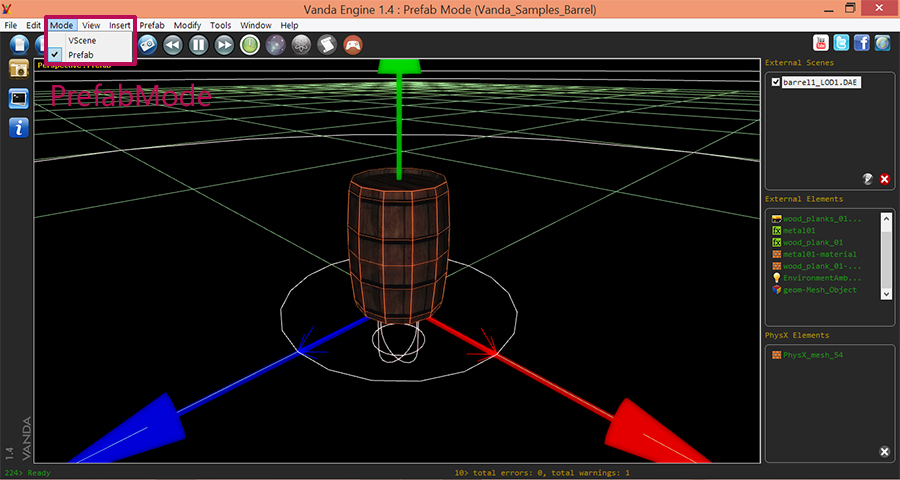
Prefab Mode
When you run Vanda Engine, it automatically activates VScene mode. We’ll talk about this mode soon. In order to create your prefabs, you need to switch to Prefab Mode. To do this, go to Mode | Prefab menu.
Level of Detail in Vanda Engine
Level of detail (LOD) is a key optimization technique that would help your video game to run faster across all the new and old hardware. Vanda Engine uses discrete LOD (DLOD) Manager.Due to that, you need to provide various models to represent the same object. Vanda Engine uses a combination of distance from the view point to the object and number of object’s samples to show different LODs of each object. LOD 1 can be viewed from a close distance (or when you zoom in on 3D object) which means it requires higher detail. However, this high amount of detail is wasted if the object is viewed from a far distance. That is why you need to reduce the visual quality of your object and assign the lower quality versions to other LODs. LOD technique is also applied to shaders to reduce render cost of distance pixels. So you can remove normal maps, gloss maps and reduce multiple textures to one texture for LOD 2 and LOD 3.
Creating the First LOD of our Prefab
I have already exported a house model from 3ds Max to COLLADA format with OpenCollada. For more information about exporting from 3ds Max, Maya, or Blender to COLLADA format, please refer to this page.
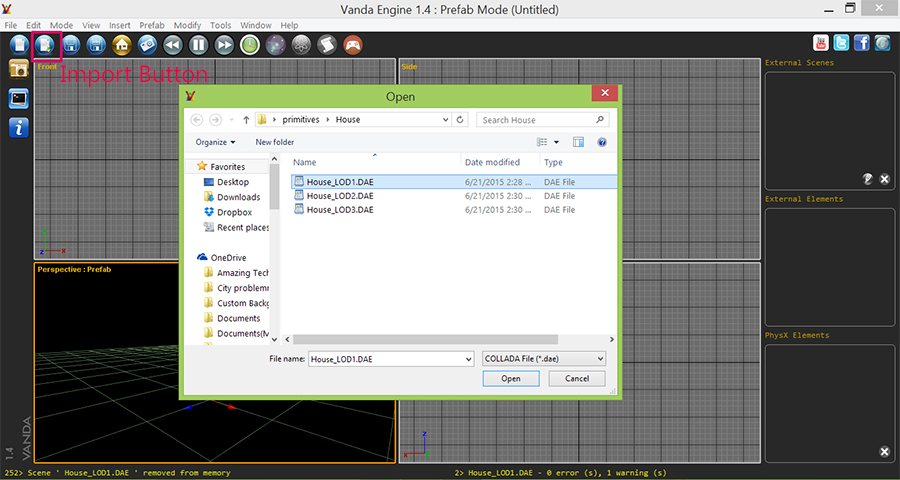
Make sure to add “_LOD1” post-fix at the end of your dae file. I have chosen house_LOD1.dae for the first LOD of house prefab. But before importing the model, let’s talk about importing textures.
While importing the models, Vanda Engine looks for the following naming conventions to load extra textures located beside the diffuse texture:
- Normal Map: Diffuse Texture Name + “_n”
- Gloss Map: Diffuse Texture Name + “_g”
- Dirt Map: Diffuse Texture Name + “_d”
For example, if Vanda Engine imports a diffuse texture called “diffuse.dds” in “C:/Texture/” path for a geometry, by default it looks for the following texture names in “C:/Texture/” to load extra textures:
- Normal Map: diffuse_n.dds
- Gloss Map: diffuse_g.dds
- Dirt Map: diffuse_d.dds
You can change these naming conventions via Tools | Import Options… menu.
Make sure that you are in Prefab mode, then Go to File | Import External Scene, locate your dae file, and hit Open.
Second LOD
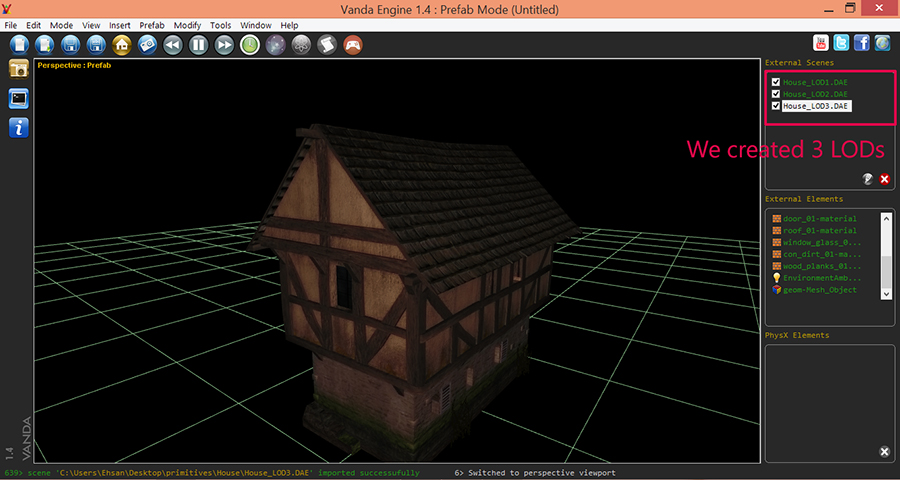
I use a lower quality model for LOD 2. It has less vertices and triangles compared to first LOD. Make sure to add “_LOD2” post-fix at the end of your dae file name (For example house_LOD2.dae).
Click File | Import External Scene…, locate your dae file, and click Open.
Third LOD
Use the lowest quality model for LOD 3. This model is visible when your camera if far from your prefab. So you don’t need to show the details of your model. Make sure to add “_LOD3” post-fix at the end of your file name and import the dae file.
Layers
As you see, there’s a check box beside each LOD. Each LOD is rendered on its own layer (Similar to Photoshop). Sometimes, you want to hide other LODs to see the elements of one LOD. In this case, we want to start working on LOD1, so uncheck LOD 2 and LOD 3.

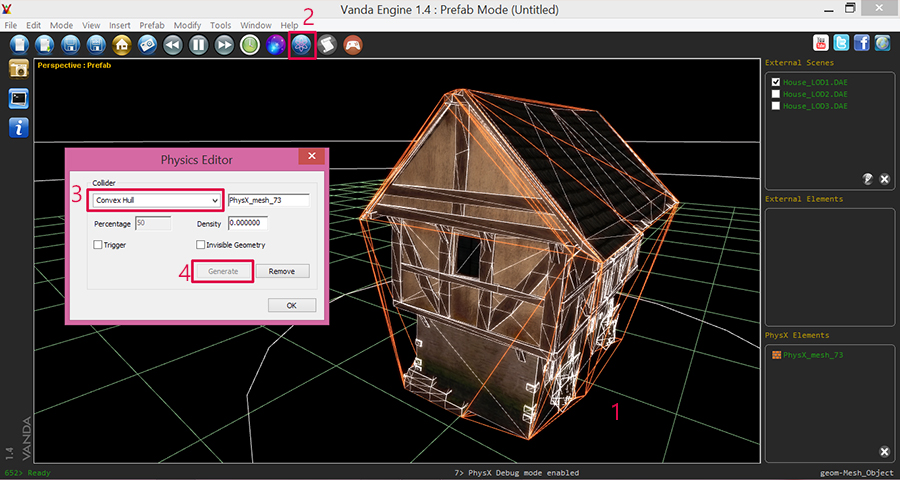
Assigning Physics colliders to LOD 1
We are going to use the built-in physics editor of Vanda Engine to generate a simple collider fo LOD 1. Select you desired geometry, and hit Physics Editor button. From the dialog that appears, choose Convex Hull collider, and press Generate. Vanda Engine automatically detects the topography of your selected geometry and creates the appropriate convex collider.
Removing Normal Maps of LOD 2 and LOD 3
These 3 LODs use the same textures. Before importing the LODs, I copied the normal maps beside diffuse textures. So when I imported these three LODs, Vanda Engine automatically imported the normal map textures and assigned them to the geometries of these LODs. Because we don’t need the normal maps for LOD 2 and LOD 3, we are going to remove them via Material Editor of Vanda Engine. Make sure to uncheck LOD 1 and LOD 3 and check LOD 2. Then select the mesh and hit Material Editor button.
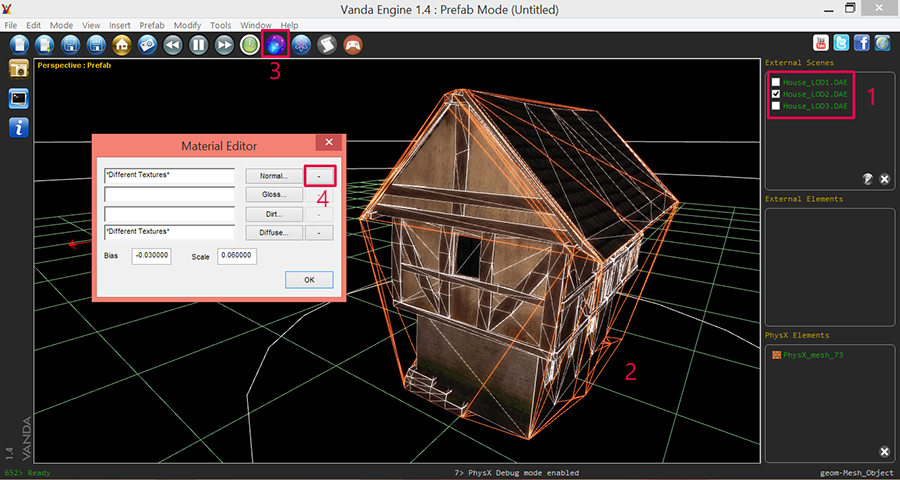
Now click the “-” button beside the Normal button and hit OK. repeat the same process for LOD 3.
Saving the Prefab
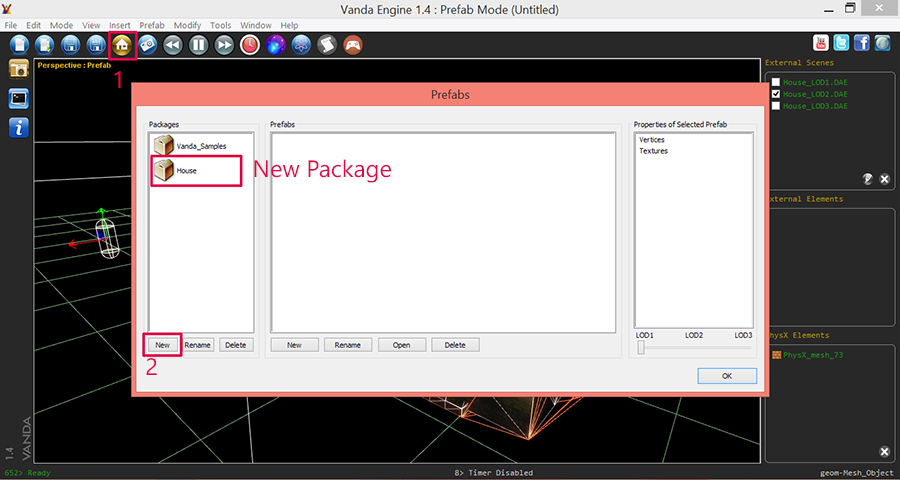
Prefabs are stored in packages. The purpose of packaging is to group similar prefabs together. For example, if you are going to create a set of modern house prefabs, it’s recommended that you create a new package, choose an appropriate name for it (for example Modern House), and save modern house prefabs in that package. Because I have created a house model, I create a new package called House and save my prefab in this package.
Now go to Prefab | Prefab Editor menu to open the Prefab Editor Dialog. In Packages group, click New button. Choose a name for your package and press OK. Press OK again to close the Prefab Editor dialog.
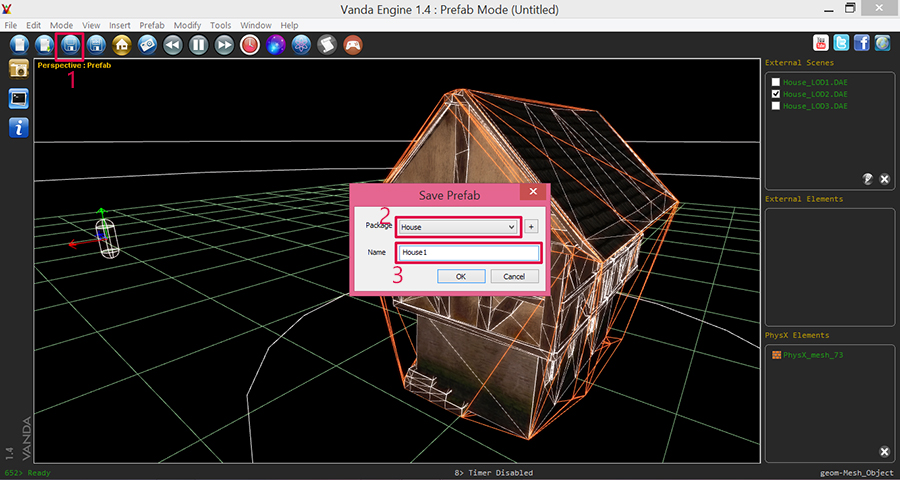
Now go to File | Save menu. From the dialog that appears, choose your new package name, type a new name for your prefab, and hit Save button.
Now if you open Prefab Editor and select your new package, you can see the new prefab in Prefabs group.
Inserting the Prefab
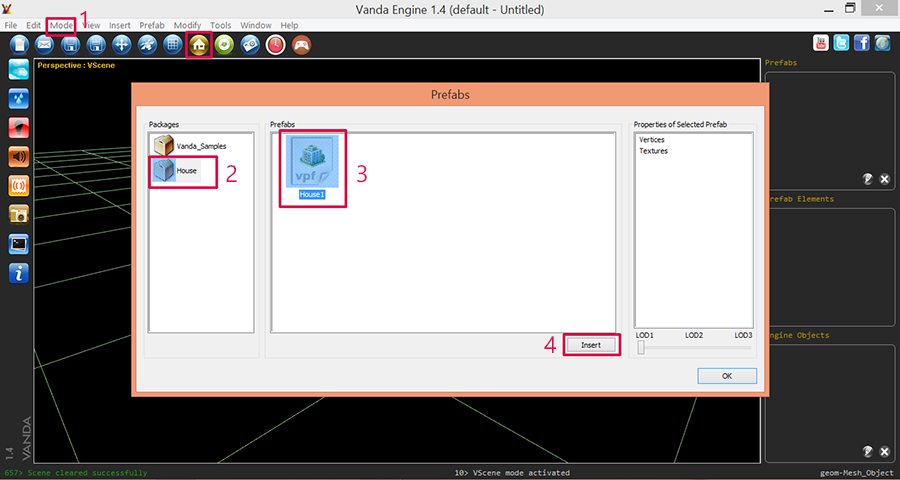
First of all, switch to VScene mode via Mode | VScene. Then go to Prefab | Prefab Editor menu, select your new package, select saved prefab, and hit Insert button.
Translation, Rotation, Scaling
You can use Edit menu (or transformation buttons) to translate/rotate/scale your prefab instance.
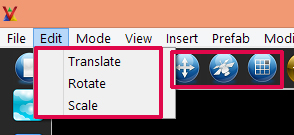
First of all, select your prefab instance, then select your desired transformation tool, then hold left mouse button and drag your mouse to transform your prefab instance.
Testing your prefab
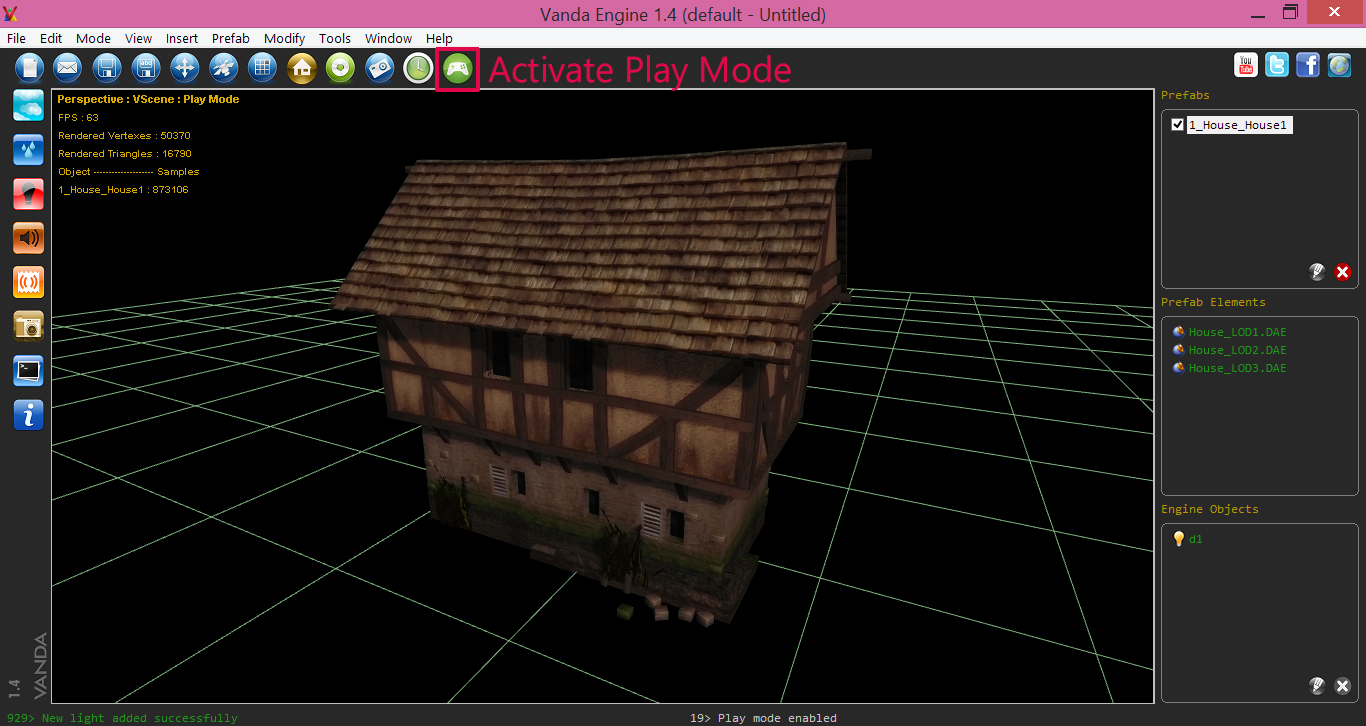
To test the LODs of your prefab instance, hold right mouse button and drag your mouse to zoom in and out. As you see, Vanda Engine switches the LODs of your prefab based on the samples (or pixels if you don’t use multisampling) of object occupied on screen. To test physics collider of your prefab, hit Play mode button, and try to hit the object. As you see, you won’t be able to walk through the object. Hit Play button to exit from Play mode.
More Prefab Instances
You can always use Prefab Editor to insert more instances of your prefab into your level.
Saving and Publishing
Click Save button, choose a name for your VScene, and hit OK button. To publish your scene, go to Project | Publish menu. For more information about publishing your project, please visit this tutorial.
References
(c) copyright Zehne Ziba Co., Ltd. For more information, please refer to copyright notice.