 Vanda Engine
In this tutorial, we mention several important tips that are essential for game development. We start by game design tips followed by tips about texturing, game performance, audio, and 3D modelling. This page is updated regularly, so please be sure to sign up for our newsletter at the end of this tutorial to receive updates about game development tips and tricks. We hope these tips come in handy.
Game Design
Tip 1 : Game Design Is A Living Creature
Game designs change, grow, and mutate. They need time to come out right. They will change over the course of game production. Simply start with a good concept and throw out bad ideas during the production if they don’t fit.
Tip 2 : The Early Stages Of The Project
By determining problems and obstacles during the early stages of game development, you can avoid extra reworking and prevent paying for assets you won’t use.
- Talk to your licensor and find out the big issues
- Talk to your publisher about their needs
- Specify character metrics such as character width, height, walking distance, attack distance, jumping distance, etc and don’t change them during the course of game production
- Establish main character, camera and control and don’t change them during the course of your project. How player interacts with the main character? What about its metrics and personality? First person camera or third person camera? loose camera or strict camera? Keyboard or Joystick? What does each button do? You got the idea
- First Person Shooter and Third Person Shooter: In order to determine gameplay duration of your final game, pace out your level with puzzles/gameplay disabled by walking from the beginning to the end of your level. This estimated time is roughly half the time it will take you from the beginning to the end in the final game. For example, if it takes 5 minutes to walk through a level with the gameplay or puzzles disabled, it takes 10 minutes to get through the level when the gameplay or puzzles are there.
- Determine sound needs of your game and don’t leave them to the last minute.
Tip 3 : Think About Your Player
Put yourself in the perspective of the player. What do they like or dislike? What will they want to see in your game?
I should mention an important point here: Kids are not stupid. Just because your are writing for kids doesn’t mean that it has to be too simple. Kids are smarter than you think. But remember that kids fingers can’t handle complex combinations of buttons. Keep button presses simple when designing for kids.
Tip 4 : Game Flow
Introduce main character, camera type, game genre, player goal, and location of your game to the player. You should develop a logical flow of events and scenes that take your player from point to point during the game story. Always balance between challenge and difficulty and gradually increase the challenges as the player skills grow. In your game design document, describe what players gain as they grow (for example weapons, items, additional attacks and so on) and how the level of challenges increase as the players succeed.
Tip 5 : Surprise Your Player
Surprise is a crucial part of game design. Human brain enjoys surprises. Experiments and brain scans reveal that surprise – even during unpleasant surprise – is much more pleasant than fixed patterns.
Tip 6 : Form Follows Function
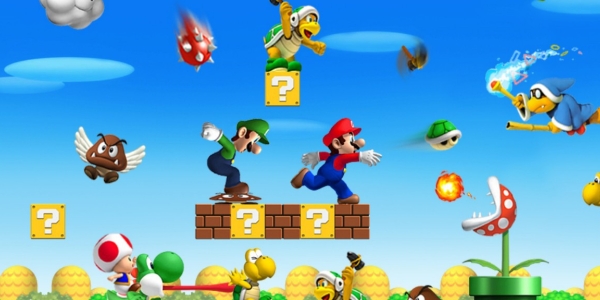
You have to determine the functions of your characters first and then apply those traits to your characters’ appearance. Super Mario was brave, happy and bouncy. So his appearance was developed based on these behaviors.
Tip 7 : Let Player Do Than Watch
Video game is about gameplay and interactivity, not cutscenes. Try to tell your story through gameplay and save cutscenes for anything that you can’t do ingame.
Tip 8 : Timing is important
Player experiences shouldn’t be too short or too long. You should make sure that your game doesn’t end too early or doesn’t go on for a long time. Try to change the mood of your game from jungle to desert to interior spaces to exterior spaces to mystery to fear to calm to surprise and so on. Although it all depends on your game, I suggest to change the mood of your game every 15 or 20 minutes. Moreover, if you are developing a FPS or TPS AAA title, it should last at least eight to ten hours.
The pricing of a game should act as an indicator for the amount of in-game content
Another point is about reward system: You should give rewards at the right times in the right moments. Unfortunately, it can be achieved with trial and error and may not satisfy all players.
Tip 9 : Economy System
Here’s the definition of economy: How will I earn money and how will I spend it?And money can be anything like skill points, coins, dollars, or other items that can be traded for anything else.
If your game has an economy system, determine the following things:
- How player earns money. Always balance the effort he puts into earning money and the items or skills he can buy with it.
- How the player will buy things (describe shopping environments as well)
- Make sure that the player has enough money to buy required items
- Make sure that your player doesn’t have so much useless money
- Use color, shape or particles to clarify the treasures.
- Should you use universal currencies or specialized currencies?
- If they can save their money in a bank, don’t make them return back to their bank place to invest their money. Let them use a simple 2D interface or something like that to quickly access and invest their money.
Tip 10 : Do Not Use Invisible Walls
Do not use invisible geometries to prevent the player from going to impossible areas. What do you feel if you hit your forehead and nose on a glass and break your head?! Instead, use visible and meaningful objects such as grasses, trees, fences, walls, etc to tell the player where he can and cannot go.
Texturing
Tip 11 : Power of Two Textures
It’s recommended to use power of two texture dimensions up to the limits of your game engine or target hardware. Otherwise, game engine will have to resize dimensions at runtime. However, texture width and height don’t need to be the same. For example, you can use texture dimensions such as 2048 * 1024, 512* 512, 256 * 4096, and so on for your textures.
Tip 12 : Remove White Pixels That Appear Around Visible Blocks
When using textures with alpha channels in your favorite game engine, you may see white lines around the visible parts of your textures, specially at far distances. It’s because game engines use several techniques such as mip-mapping, blilinear, or trilinear to display textures at different sizes on screen. These down-samplings and up-samplings mix transparent pixels with the adjacent visible pixels. To cope with this problem, make sure that completely transparent parts of your texture have a color which matches their neighboring pixels. I prefer Flaming Pear Free Plugins pack to solve this issue.
For more information, please refer to the following tutorial:

Left: original image, Right: Image after applying Solidify B filter
Tip 13 : Use Compressed DXT (.dds) Textures
It’s recommended to use BC / DXT compressed format for most textures of your game. DXT is also known as S3TC or s3 Texture Compression. In general, all GPUs today support decoding DXT compressed textures. DXT format is a texture format, meaning that it can contain information such as mip-maps, cube maps and volume textures that other image formats such as PNG or TGA don’t support. DXT compressed textures are faster and more memory efficient than uncompressed textures such as TGA. I personally prefer to use NVIDIA texture plugin for Adobe Photoshop to save the textures in DXT compressed formats.
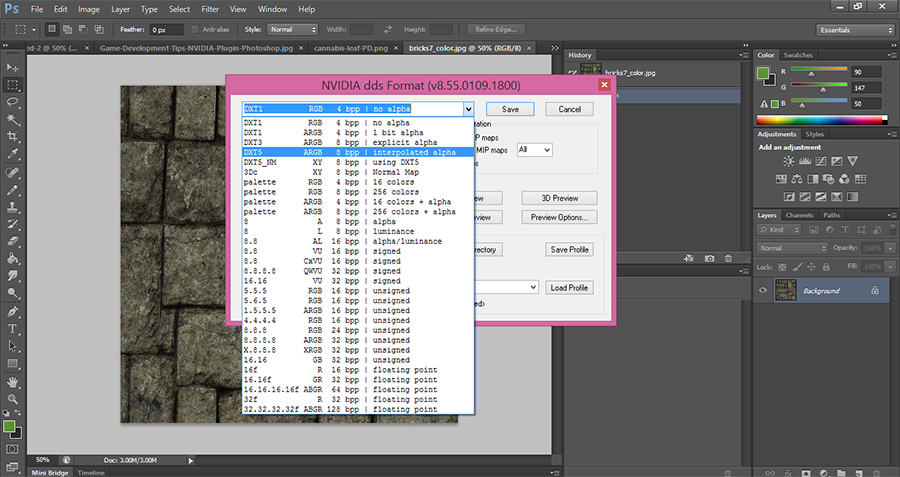
NVIDIA plugin lets you save your textures in DXT1, DXT3 or DXT5 compressed formats
For more information about common compressed texture formats, please refer to this tutorial: An overview to common compressed texture formats
Tip 14 : When You Must Use Power Of Two!
Width and height of DXT textures must be power of two to be loaded and displayed by game engines. DXT compressed textures use block compression technique to reduce texture size. Since block compression algorithms operate on 4×4 texel blocks, you can’t use a dimension smaller than 4 for your DXT compressed texture. So 1024 * 4 is OK, but 1024 * 2 is not.
For more information about batch processing to change the file format of images to DXT format in Photoshop, please refer to this tutorial.
Tip 15 : Do Not Use Compressed Texture For UI Elements
Although it’s recommended to use compressed formats for most textures of your game, UI elements such as icons and texts are not a good candidate for compression and their artifacts are more noticeable if compressed.
Tip 16 : Bake To Textures
If you have trouble exporting effects and shaders from your 3D tool to your favorite game engine, try to bake those effects to textures in your 3D tool.
Tip 17 : One Larger Texture Is Better
One large texture is faster than multiple smaller ones. Modern GPUs like you to send data in large batches. Switching the textures means grinding everything to a halt which breaks the performance. So instead of submitting 4 similar shaders with different textures, try to combine those textures to one unit and send 1 shader to GPU in one large batch.
Tip 18 : Texture Anisotropy
Anisotropics texture filtering is a technique to increase texture quality when viewed at narrow angles. This technique is performed by the GPU at run-time and can be very costly. Due to that, only use this filtering for ground, ceiling, road, terrains, or any other object that may be viewed at shallow angles.
Tip 19 : Don’t Hesitate To Use NVIDIA Plugin
You can use NVIDIA texture tools for Adobe Photoshop to generate normal maps, mip maps, cube maps, and save textures as DXTC format. Simply download and install the plugin, then run Photopshop, and from the main menu of Photoshop, go to Filter | NVIDIA Tools… | NormalMapFilter. There are several documentations included in installation folder of setup file (In my case it’s C:\Program Files\NVIDIA Corporation\NVIDIA Photoshop Plug-ins 64 bit). These documents are very handy and explain all settings of NVIDIA texture plugin in detail.

Tip 20 : Or Use gimp-dds Plugin For Gimp
If you’re using Gimp, you can download and install gimp-dds plugin from Google Code. It supports all common compression formats including BC1, BC3, BC4, BC5 and so on.
For more information about exporting from Gimp to DDS compressed textures, please refer to the following tutorial:
Performace
Tip 21 : One Large Mesh Or Several Smaller Ones
In term of computer graphics, one large mesh is faster than multiple smaller ones. This will reduce draw calls and improve game performance. However, consider the following scenarios:
- It will affect occlusion culling. Most game engines calculate occlusion query based on individual objects on the scene.
- Consider a large corridor. It will be a real pain to change one part of the corridor in your favorite 3D tool and re-export the whole mesh to your favorite game engine. Moreover, corridor model has not many individual parts, so performance gain of using a large model for corridor is unimportant.
- Some game engines are limited to maximum number of vertices per mesh (this maximum value depends on game engine).
- Assume that your large mesh consists of animated and non-animated vertices. In this case, game engines have to update the whole mesh despite the fact that some vertices are not animated. Depending on mesh complexity, it’s a good choice to split your large mesh to animated and static meshes.
- You have transparent objects like windows on your scene. In this case, you want to export them separately, so they can be depth sorted correctly.
- Some parts of your mesh should be controlled by physics engine. It’s a good idea to export those parts separately, so they can be updated individually.
So the answer is that it all depends on the situation.
Tip 22 : Optimize fragment shader
- Move computations to vertex shader if possible.
- Reduce the number of texture lookups. Fragment shader generally gets slower when you use more texture lookups.
- Consider hardware limits on shader.
- Use constants or uniforms instead of computing values in shader.
- Remove unnecessary loops.
Tip 23 : Other Optimization Tips
- Use Ultimate Unwrap 3D software to reduce the poly counts
- Try to remove transparency if possible.
- Use dynamic lighting for important objects and baked lightmaps for other objects
- Use dynamic shadow for movable objects and baked shadows for static objects
- Do not use high quality sounds such as a sound with 96000 sample rate. Most games use 48 or 44.1 Khz sample rate
- Try to remove extra joints from skeletal animation if possible
- Built-in primitive physics colliders such as sphere, box and capsule are faster than physics mesh colliders imported by artists.
- Reduce materials. Top game engines let you assign multiple materials to the same mesh, but they increase number of draw calls which is costly for performance
Audio
Tip 24 : Use Ogg Vorbis Audio Format
Most 3D games use .ogg file format. In general, Ogg Vorbis is much better than Mp3 format and gives you better quality for the same file size. Unlike MP3 format, Ogg format can be looped seamlessly. Ogg is free and open source, which makes it unrestricted by software patents. There are many programs to convert, encode, and decode Ogg Vorbis. I personally use Audacity to save .ogg files. It’s free and open source with a variety of plugins and effects.
For more information about converting from mp3 files to ogg files in Audacity, please refer to the following tutorial:
For more information about essential audio concepts for game developers, please refer to the following tutorial:
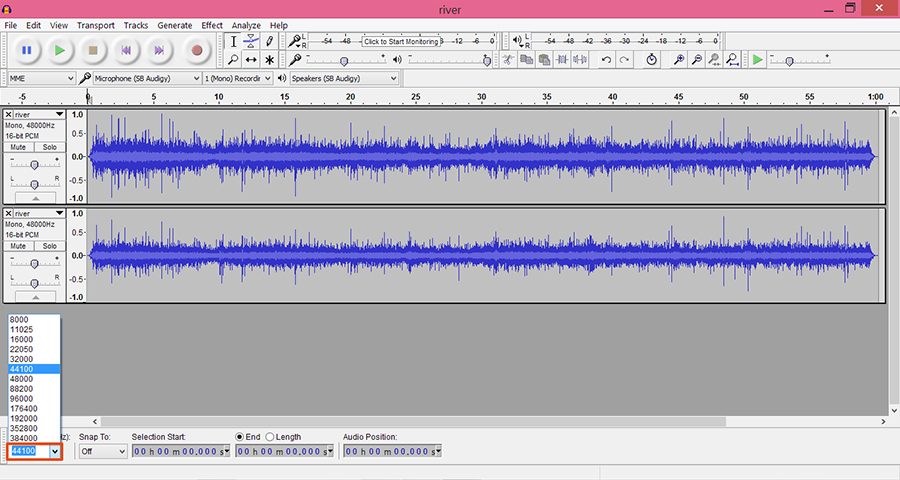
Audacity is a free software capable of manipulating and saving .ogg files
Tip 25 : Use mono sounds for 3D sound system
If you use stereo audio files for sound sources located in your 3D level, game engine won’t be able to calculate 3D sound based on the parameters of source and listener.
Modelling
Tip 26 : World Center
Before exporting to your favorite game engine, make sure that your model is at world center (0,0,0).
Tip 27 : Set up With An Appropriate Scale
Always set up your modelling tool with an appropriate scale. The simplest way to approach this is to create a 1*1*1 cube in your favorite game engine, then create a 1*1*1 cube in your favorite 3D tool, export the cube from your 3D tool to game engine, and make sure that they match eachother. If they don’t, try changing the scale settings of your 3D tool until you get appropriate result.
If you have other tips, please leave a comment and let’s discuss.
Furthur Reading
(c) copyright Zehne Ziba Co., Ltd. For more information, please refer to copyright notice.