 Vanda Engine
Although Vanda Engine provides several functions to activate, deactivate, blend, or mix the animations of rigged characters, you must:
- Build and rig your 3D character model in your favorite 3D tool such as Maya, 3ds Max, Blender, or Cinema 4D
- Fully construct its animations in dedicated software like Maya, 3ds Max, Blender, Or C4D
- Export your 3D character as well as its animations to COLLADA 1.4 (dae) format.
Vanda Engine provides two ways to import different animations of your 3D character:
- Construct separate ‘animation clips’ for your 3D character in your favorite 3D tool and export them to one dae file. In this case, the character and its animations are presented in the same file.
- Export your T-Pose character with its meshes, UVs and materials to COLLADA format. Then export each separate animation to one dae file. In this situation, the animations exist in separate files to the model to be animated. If you use this method, it’s recommended to remove UVs and materials while exporting the animations to dae files to boost the performance. If you use OpenCollada exporter for 3ds Max or Maya, you can check Animation and uncheck other options which lets you only export animations for your character.
Unfortunately, many 3D tools don’t support what COLLADA calls ‘Animation Clips’. Due to that, you want to use the second method if your 3D tool doesn’t support animation clips. In this tutorial, we use the second method to import the rigged character and its animation into Vanda Engine.
for the second method to work, meshes and skeletons of base file (T-Pose) and animation files must be identical.
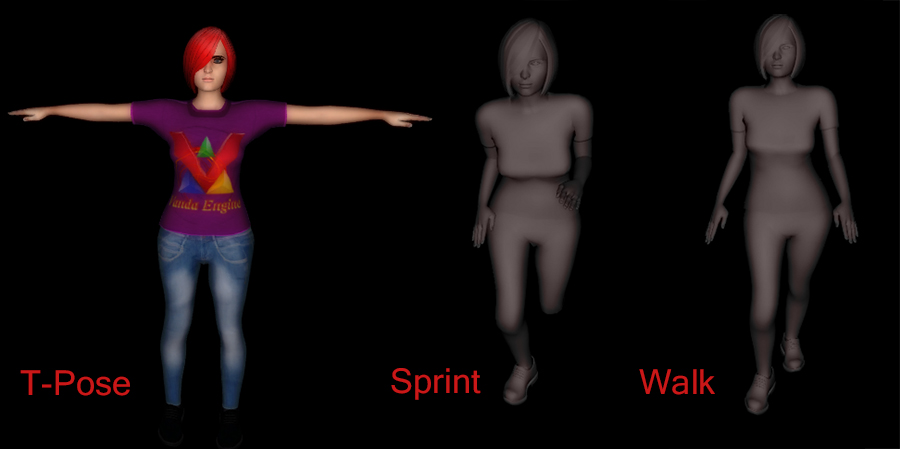
An example of T-pose model with separate animations. We haven’t exported UVs and materials for animations to speed up load times
Vanda Engine supports animation blending. Assume you have created two separate animations for idle and walk actions and exported them to Vanda Engine. You are playing idle animation and at some point, you decide to deactivate idle animation and activate walk animation of your character. Without animation blending, you’ll see a sudden change from idle animation to walk animation which is very annoying. In this case, Vanda Engine lets smooth transition from idle animation to walk animation to create a realistic behavior. Vanda Engine also supports animation mixing, which means two or more animations can be mixed together to create a new behavior.
Vanda Engine lets you play animations in loop (BlendCycle), play them only once (ExecuteAction), or play them in reverse order (ReverseExecuteAction).
Importing
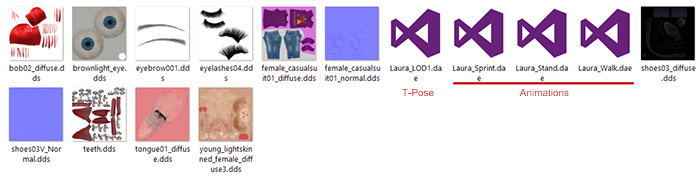
Run Vanda Engine and switch to prefab mode by going to Mode | Prefab. Vanda Engine provides a tool which lets you import T-Pose character as well as its animations to Vanda Engine. We have already made a woman model with three separate animations: idle, walk, and sprint.
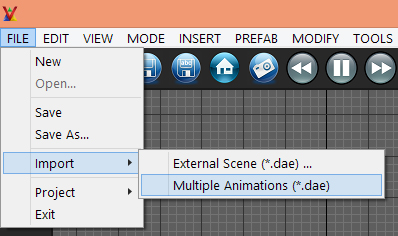
In order to import a character with multiple animations, go to File | Import | Multiple Animations (*.dae). This will bring a dialog which lets you select your T-Pose mesh as well as its animations.
In this tutorial, I want to create one LOD for woman character. Due to that, make sure to add _LOD1 postfix to the dae file that contains T-Pose model. In order to add T-Pose mesh, hit Base Model… button, locate your dae file, and press Open button.
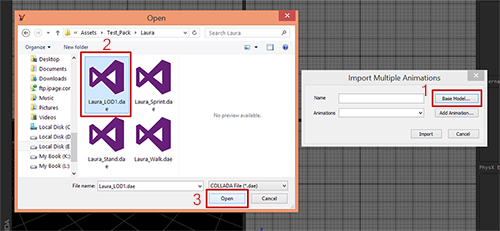
Now it’s time to add animations. We have already exported individual animations to separate dae files. Note that you do not need to add _LOD1 post-fix to animation files. In Import Multiple Animations dialog, hit Add Animation… button, add your first animation file, and press Open button. Repeat the same process till you select all the files. Finally hit import button to load and import the model as well as its animations.

Testing The Animation
To make sure that our imported animations work as expected, we can test them in prefab mode. Select your character by clicking somewhere on your model, and hit Previous Animation/Next Animation buttons to test your animations.
Setting Up Initial States
By default, Vanda Engine activates first imported animation and plays it in loop. In order to activate your desired animation in your game, you must tell Vanda Engine which animation should be played in what state. In External Scenes section (upper right corner of editor), choose your dae file, and hit Edit button to open the Scene Options dialog.
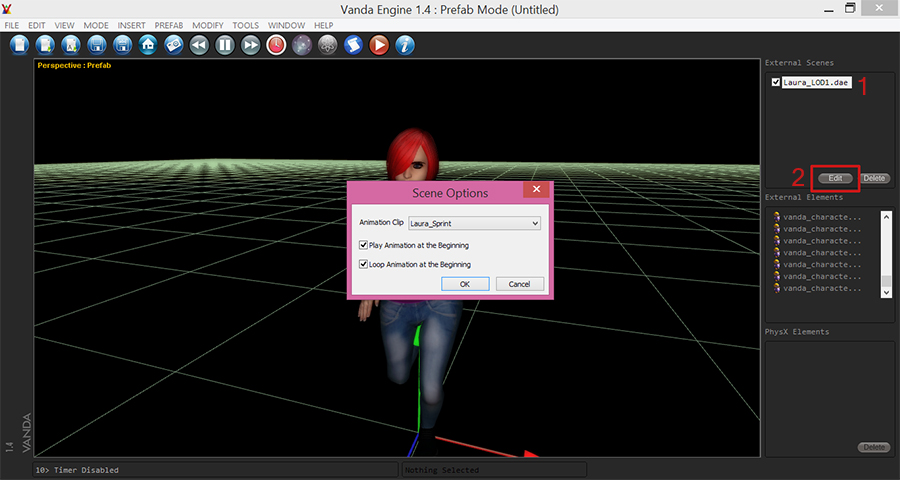
I want to play stand state in loop while loading the level, so I select Laura_stand animation clip and make sure that Play Animation At The Beginning and Loop Animation At The Beginning are checked. Hit OK button to confirm your changes.
Saving As Prefab
Finally save your scene as prefab. For more information, please refer to Saving The Prefab section in the following tutorial:
(c) copyright Zehne Ziba Co., Ltd. For more information, please refer to copyright notice.