 Vanda Engine
In this tutorial, we use free gimp-dds plugin for Gimp to export the image to a compressed dds (DXT) file. dds is a texture format, meaning that it can store mip-maps, cube-maps, and several other data that image formats don’t support. Due to their optimal size and good quality, DXT compressed textures are mainly used for 2D and 3D video games. To have a solid understanding of gimp-dds plugin, we explain its parameters in detail and mention several tips and tricks that are useful for today’s games.
Gimp-dds Plugin
Please download and install Gimp-dds plugin from Google code. Now run Gimp or restart it if it’s already open.
Power Of Two Dimensions
When exporting to dds format, your image must be power of two. Otherwise, game engines won’t be able to display your textures. It’s because DXT compression algorithms operate on 4 * 4 texel blocks to reduce texture size. For the same reason, your image dimensions shouldn’t be less than 4 pixels. For example, 512 * 1024 and 4 * 256 are valid dimensions, but 640 * 480 or 2 * 1024 are not.
Exporting To DDS Format
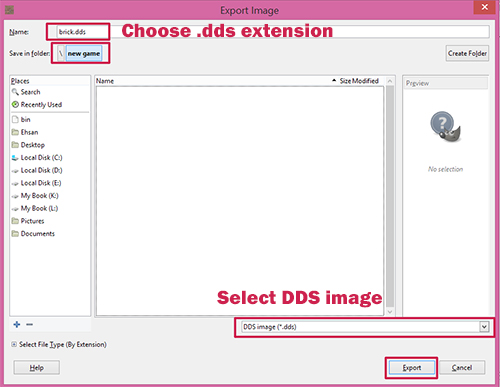
From the main menu of Gimp, go to File | Export As…. This will open the Export Image dialog which lets your choose image type, name and location. Select DDS image (*.dds) type, give your file a name (make sure to add .dds file extension), select target location, and hit Export button.
This will bring up the Save As DDS dialog. It’s time to roll up our sleeves and scrutinize its parameters!
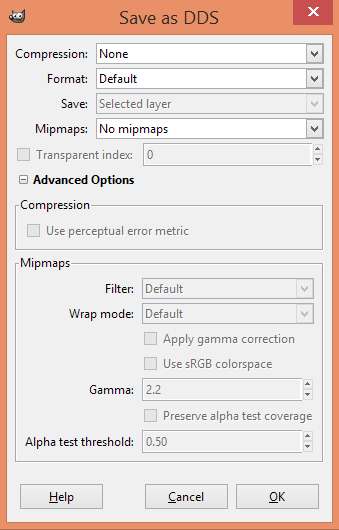
Save As DDS Options
Compression
We have published a complete tutorial about the common compressed texture formats implemented by gimp-dds plugin. For more information, please refer to Texture Compression Types.
Mipmaps
If you’re exporting dds textures to be used in your favorite game engine, check this option. This will automatically scale your original image into multiple smaller resolutions, each of which with half the size of the previous. All of these generated mip-maps are stored in your exported dds file to be loaded and used by game engine.
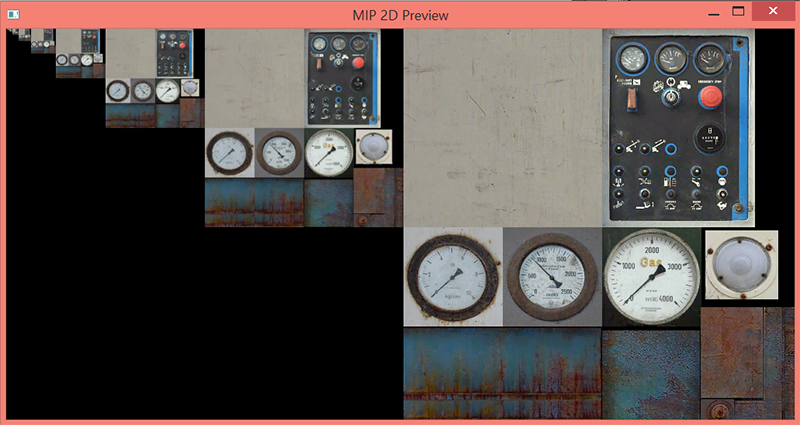
DDS is capable of storing mip-maps (Preview generated by NVIDIA texture tool)
Advanced Options
Filter
This option lets you specify texture filters. Mip maps will be generated automatically from the previous level using the downsampling filter specified by this parameter. Nearest filter is the crudest filtering mode and is not recommended for today’s games. Remember that better filter only affects the time required to generate the mipmap levels by gimp-dds plugin and has no effect on your game performance. So it’s always a good choice to use the best filters to get the best quality for mipmap levels. You can compare the result of these filters at ResizeFilter page.
Wrap
This parameter is used when sampling the texture borders while generating the mipmap levels. Mirror mode generally looks good, but sometimes you need to choose other parameters to get the best results.
Apply Gamma Correction
If smaller mipmap levels appear noticeably darker than larger ones, this option lets you apply gamma correction to fix this issue.
Use sRGB Color Space
This options enables sRGB gamma. sRGB gamma cannot be expressed as a single value. Due to that, you can’t control its value in gimp-dds plugin. I’m not going to delve into the details of sRGB color space. For more information about this topic, please refer to Wikipedia.
Gamma
Lets you specify the gamma value. Default value is 2.2.
Preserve Alpha Test Coverage
Standard mipmap algorithms produce very bad results on alpha tested textures. This options solves this issue by choosing a suitable scale factor that preserves the original alpha test coverage as best as possible. For more detailed explanation about this problem and possible solutions, please refer to Computing Alpha Mipmaps tutorial.
Alpha Test Threshold
You should use trial and error to find the best alpha test threshold to fix the aforementioned problem.
(c) copyright Zehne Ziba Co., Ltd. For more information, please refer to copyright notice.