 Vanda Engine
In this tutorial, we create a door prefab and animate the sci-fi door model with triggers and basic scripting in Vanda Engine.
Door Prefab
Our door model contains 2 separate parts: a static door frame and a dynamic door. When you import an animated mesh, Vanda Engine updates all vertices of the mesh once per frame, despite the fact that some vertices of the mesh are static. On the other hand, static meshes are updated while loading the level (vs. updating once per frame) and cashed into memory to be displayed with little extra overhead. Due to that, we can split our door model to two separate prefabs to avoid spending extra processing power: One static door frame prefab and one dynamic door prefab. In this case, our door frame prefab will only get updated while loading the level, and animated door prefab will get updated once per frame.
I have already split door model to two separate meshes and exported the individual parts to dae files with OpenCollada. For more information about animating a door model in 3ds Max and exporting to COLLADA format, please refer to the following tutorial:
Door Frame Prefab
Let’s create our static door frame prefab. Please download and unzip doorMesh.zip file. There are two dae files included in zip file: doorFrame_LOD1.dae and door_LOD1.dae. doorFrame_LOD1.dae will be used to create door frame prefab.
Importing Door Frame
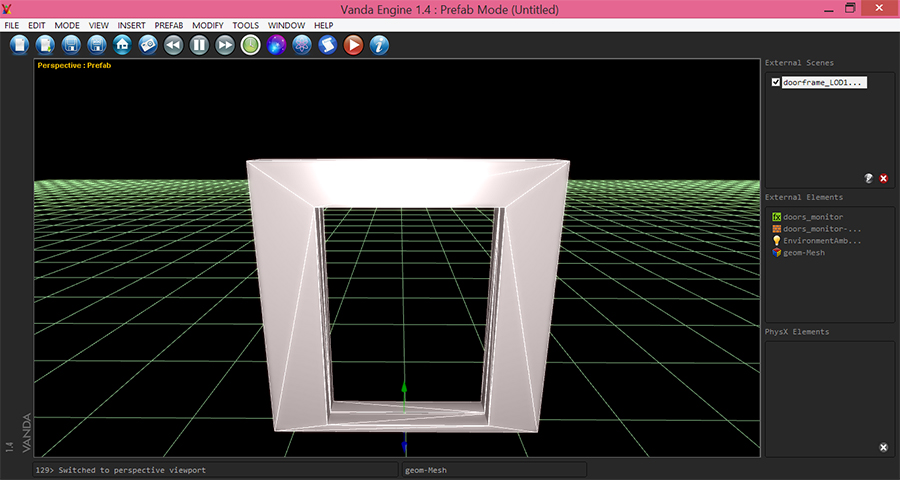
Run Vanda Engine and switch to Prefab mode by going to Mode menu | Prefab. From the main menu, go to File | Import | External Scene (*.dae), locate doorFrame_LOD1.dae, and press Open to import the door frame mesh.
Attaching Diffuse, Normal, And Specular Maps
Now we’re going to attach diffuse, normal, and specular maps to our door frame mesh. Select door frame, hit Material Editor button, and in Material Editor dialog that appears, hit Diffuse… button. Find door_monitor_d.dds located in extracted folder and press Open to attach the diffuse texture to selected mesh.
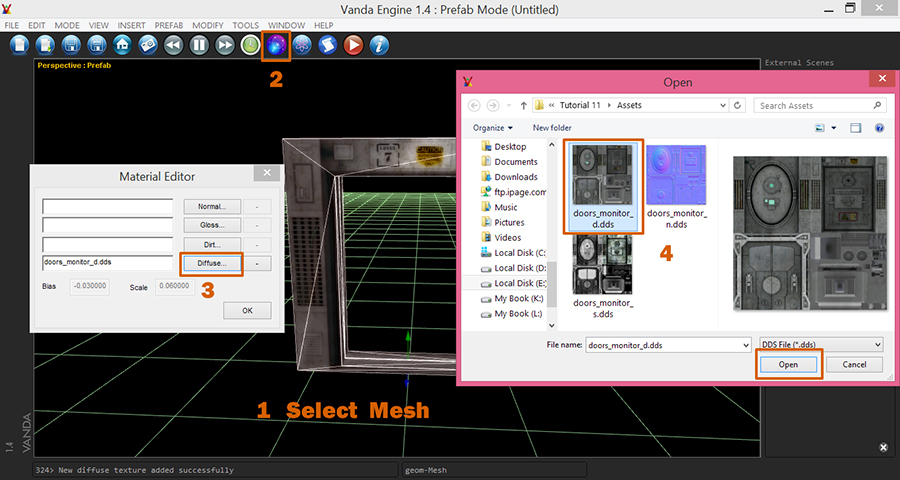
Now we’re going to add specular gloss map to our door frame. In Material Editor dialog, click Gloss… button, locate doors_monitor_s.dds, and press Open. This will attach the gloss map to our door frame mesh.
Finally, to apply the normal map to door frame, hit Normal… button, locate doors_monitor_n.dds, and press Open.
Generating PhysX Collider
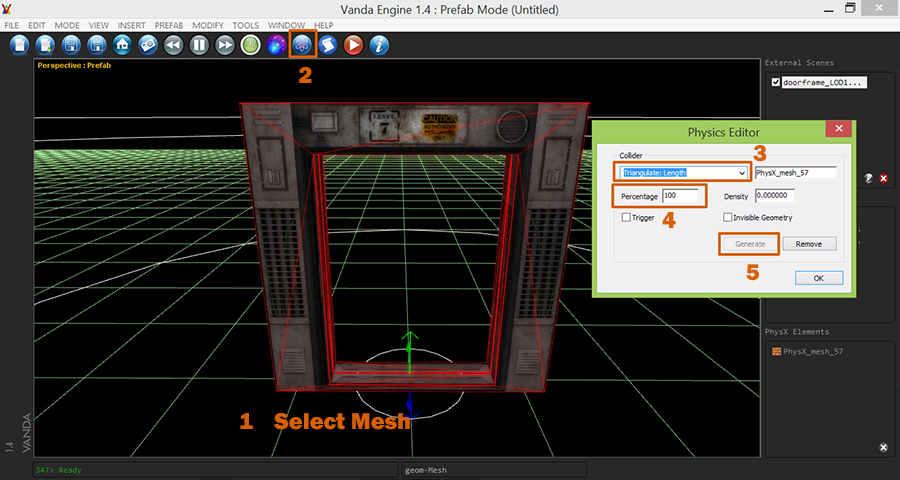
Because we should be able to walk through the middle of door frame, box and convex colliders are not suitable for our purpose. Due to that, we’ll add a triangulated mesh collider for door frame. Triangulated collider shape takes the polygon mesh and builds its shape based on that mesh. First of all, make sure that your door frame is selected. From the main menu, go to Modify | Geometry | Physics. This will bring the Physics Editor which lets you generate a physics collider for selected mesh. Make sure to use the following values for designated parameters:
- Type : Triangulate : Length
- Percentage: 100
- Density : 0
- Trigger: Unchecked
- Invisible Geometry: Unchecked
Percentage property is valid for triangulated colliders and specifies the percentage of number of polygon mesh vertices. Default values is 50, meaning that triangulated mesh collider uses half the amount of polygon mesh vertices. We want to create an accurate triangulated collider based on all vertices of our door frame. So make sure to set this property to 100.
You cannot specify a non-zero density for triangulated colliders, meaning that triangulated colliders are static colliders.
We don’t want to generate a trigger based on the shape of our door frame. So make sure to uncheck Trigger property.
Finally, we don’t want to create an invisible door frame with collider, so make sure to uncheck Invisible Geometry as well.
Press Generate button to generate the collider and hit OK to close the Physics Editor dialog.
Saving Door Frame Prefab
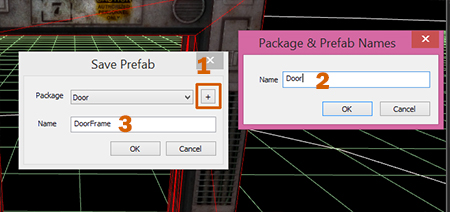
To access the Save Prefab Dialog, point to Save on the File menu. Click + button to create a new package named Door and hit OK to confirm. give your prefab a name and hit OK to save your prefab in Door package.
Door Prefab
Importing and applying the textures
Now it’s time to create our dynamic door prefab. Go to File | New to close the current scene and open a new scene. Go to File | Import menu, locate door.dae, and hit Open. Repeat the same process to assign diffuse, normal and specular maps to your animated door mesh.
Generating physics colliders
Box collider is useful for roughly box shaped meshes and fits the shape of our animated door model. Because our door model is animated, position and rotation of its collider is controlled by door mesh.
Make sure that door mesh is selected, then point to Geometry | Physics from the Modify menu, and set the following values for appropriate parameters:
- Type : Box
- Trigger: Unchecked
- Invisible Geometry: Unchecked
Press Generate button to generate the box collider and hit OK to close the Physics Editor dialog. In order to test the box collider in play mode, select door mesh, hit Play Animation button. As you see, its box collider does not move with door mesh. It’s because you are not in Game mode and Vanda Engine does not update the physics colliders.
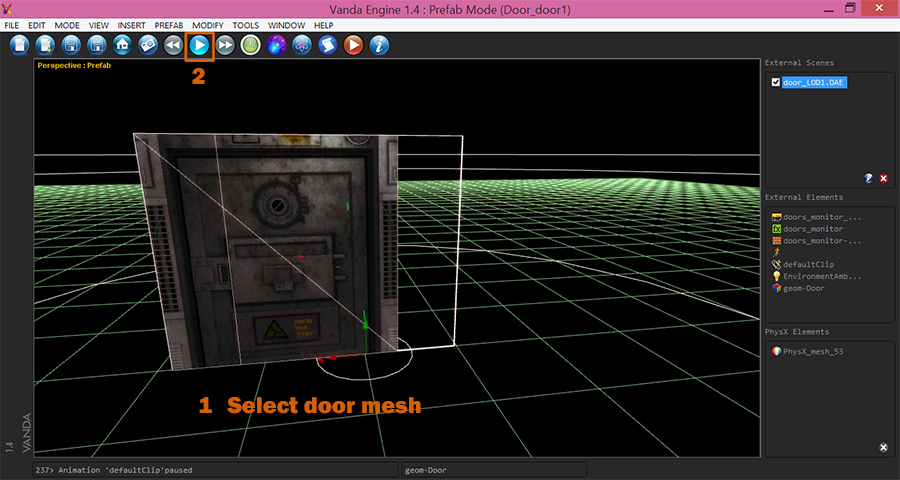
To see what happens in our game, we should enter Game mode. Hit Play Game button and your collider should follow the animated door mesh.
Saving The Door Prefab
From the main menu of Vanda Engine, choose File | Save. Select Door package, give your prefab a name, and press OK to save your prefab.
Conclusion
Now that we have created our prefabs, we are ready to insert the prefabs in our level and open and close the door with trigger and scripting.
(c) copyright Zehne Ziba Co., Ltd. For more information, please refer to copyright notice.