 Vanda Engine
Major 3D tools let you create instances or copies (duplicates) of 3D objects and export them to Vanda Engine in COLLADA format. When you copy a 3D object in your favorite 3D tool, you actually create a completely separate clone from the original. In this case, modifying one has no effect on the other. On the other hand, creating an object instance generates a visual pointer back to the original. Modifying an object instance is the same as modifying the original object. However, each instance has its own transformation, so it can have its own translation, rotation, scaling and shearing.
In this tutorial. I show you the difference between Object Copy and Object Instance in Vanda Engine.
Object Instances
Shared Information Among Object Instances
When you create instances of an object in your 3D tool and export them to Vanda Engine, the following information are shared among instances:
- Vertex and Normal vectors
- Textures (Diffuse, Gloss, Specular, Normal)
- UV Sets
- Materials
- Animations
Unshared Information Among Object Instances
The following information are not shared among object instances:
- Transformations (Translation, Rotation, Scaling, Shearing)
- PhysX Actors generated by Vanda Engine
It means that each instance has its own transformation and PhysX actors.
Object Copies
When you create copies of an object in your 3D tool and export them to Vanda Engine, each copy has its own information including:
- Vertex and Normal vectors
- Textures (Diffuse, Gloss, Specular, Normal)
- UV Sets
- Materials
- Animations
- Transformations (Translation, Rotation, Scaling, Shearing)
- PhysX Actors generated by Vanda Engine
Example 1: Instancing
I created and animated a cube in 3ds Max, then created an instance of that cube, and specified a translation, rotation and scaling for the instanced cube. Both of them share Vertices, Normals, Textures, UVs, Materials, and Animations. But each of them have their own transformations.
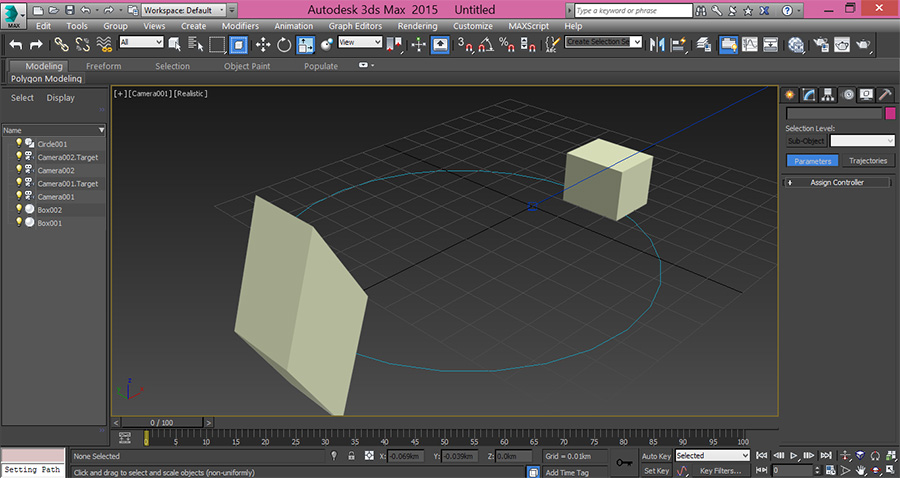
Now I export the scene to COLLADA format with OpenCOLLADA and import the scene into Vanda Engine. Make sure to add _LOD post-fix at the end of your file name (for example cube_LOD1.dae).
Selection And Texture Assignment
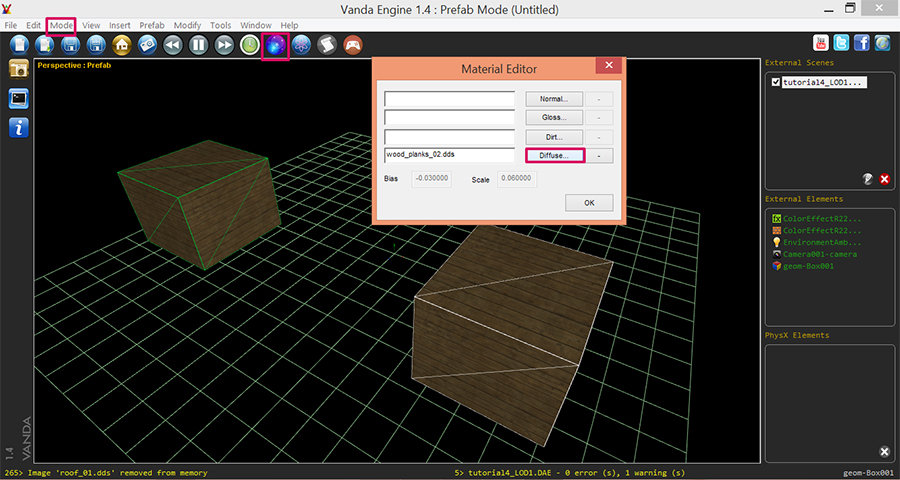
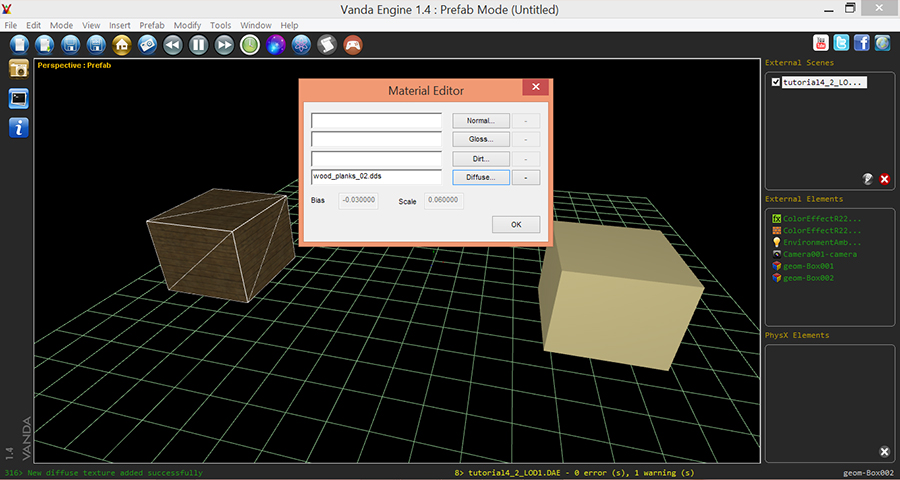
Run Vanda Engine and make sure that you are in Prefab mode (Mode | Prefab). Click File | Import and locate your dae file. When you select an instance, its edges become white and edges of other instance becomes green. It means that selected instance (white) and another instance (green) share some information as describe in Shared Information Among Object Instances section. So they should share texture information as well. With one instance still selected, hit Material Editor button, click Diffuse button, and select a dds texture. As you see, both cubes are updated and share the same diffuse texture.
PhysX Actors
As described earlier, each instance uses its own PhysX actor, meaning that PhysX information are not shared among object instances. With our instance still selected, hit Physics Editor button, select Box collider, hit generate and click OK.
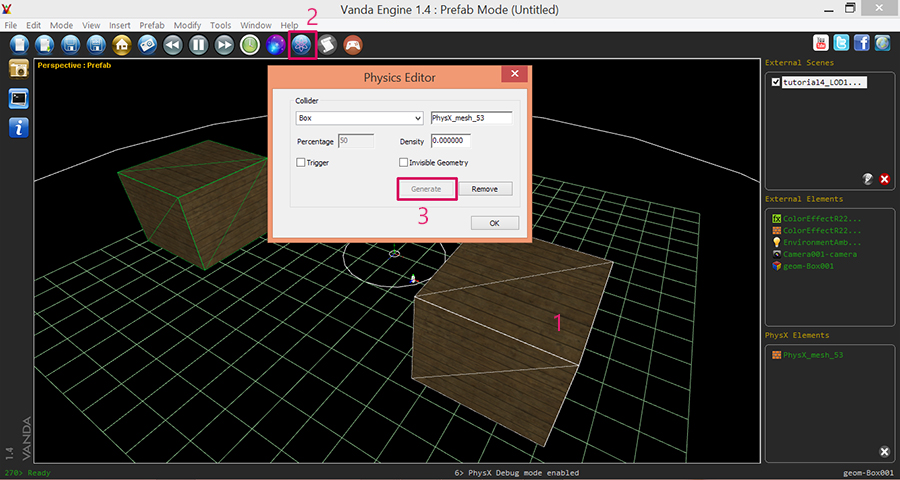
This will create a box actor for the selected instance. If you activate the Play mode and hit the selected instance, its collider prevents you from passing through the cube. However you will be able to walk through the green instance. It means that we have only assigned a collider to the selected instance.
Now select another instance, hit Physics Editor button, but this time select Convex Hull collider type and press Generate button. As you see, a convex wire frame appears around the selected instance, meaning that it has its own convex collider.

Example 2: Object Copying
Now I create an animated cube in 3ds Max, create a copy of the original cube, use translate, rotate and scale tools to change its transformation, and export the scene to Vanda Engine.
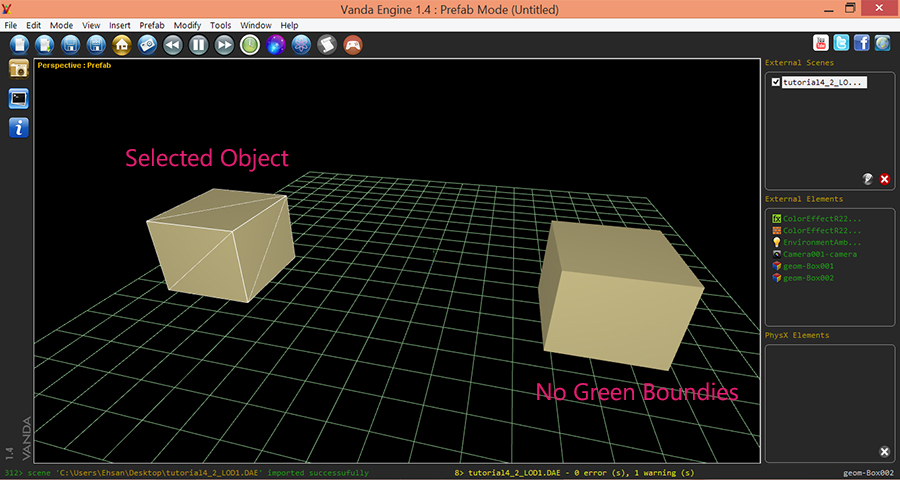
Now I import the scene into Vanda Engine and select one cube. As you see, it becomes pink, but the other cube doesn’t change its color to green, meaning that these cubes are separate objects and don’t share geometry data.
With cube still selected, hit Material Editor button, press Diffuse button, and select a dds texture. As you see, updating the selected cube does not update the other one.
Example 3: A School of fish
If you wanted to create a school of swimming fish, then make many instances of a single fish in your favorite 3D tool and export the scene to Vanda Engine. The whole school would swim with exactly the same animations, but each fish can have its own translation, rotation, scaling, and PhysX actor.
References
(c) copyright Zehne Ziba Co., Ltd. For more information, please refer to copyright notice.